
Horizontal Dropline Menu in Suffusion
Like a year ago we need an horizontal menu on renobilia.nl. The first level of submenus need to drop horizontal at hover on their parents, but the next level need to drop down as usual. At that time I can’t do that with Suffusion, any solution I tried ended to conflict with Suffusion menus. In Suffusion can only mimic the horizontal bar, without dropping effects, by using breadcrumbs which can be formatted as menus by custom CSS.
So, for Renobilia I was forced to use Jambo theme from Simple Themes, a free theme which had horizontal dropline built-in. I made then a lot of changes in theme files, changes which in Suffusion can be made by setting few options.

Last days, the question was asked again on Suffusion Forum – how can be added an horizontal menu in Suffusion?
For simple lines which contain sub-pages of current page item can easily set “Show all siblings, and all siblings of parent” at Suffusion Options -> Other Graphical Elements -> Breadcrumbs and Page Navigation. These new lines can be formatted, aligned and positioned by CSS to looks like a secondary navigation bar.
But, for building a real dropline with dropdowns, Suffusion Options aren’t enough. Let’s take a look at Superfish which provide what we need – the Nav-Bar menu. I integrated the Superfish Nav-Bar menu on a site of Iefie, so all the codes are from there, you will have to adapt the colors and other formatting to your site.
The steps are those described in my other post Adding jQuery plugins in Suffusion:
1. Download the Superfish plugin of Joel Birch. We will need only the files from superfish-master/src/ folder. Also, put in this /src/ folder the file waituntilexists.js downloaded from here: Download WaitUntilExists. I found this file here: https://javascriptisawesome.blogspot.ro/2011/07/faster-than-jquerydocumentready-wait.html and will be a great addition for our menu – is transformed immediatelly when is generated and not after all page is loaded.
2. Edit in a Text Editor (Notepad or similar) the file superfish.css from src/css/ folder and replace all occurrences of sf-menu class with ssf-menu (Suffusion also use the class sf-menu, so, will have for sure a conflict if you skip this step). You can do this easily with Search & Replace function of your text editor.
3. Copy all files from /src/ to a folder on your server (I made /sf/ subfolder under /wp-content/). Remove jquery.js as the jQuery library is already loaded on your site, we don’t need to load it twice, another call to it will break javascripts.
Can download a zip archive with all needed files changed as above: Download the modified Superfish Files. Unzip archive and upload the files to your server.
4. Now, unlike how I presented in the article about jQuery plugins, we will prepare first the HTML source of our menu. No, we don’t need to write any line of HTML code, WordPress already provide Custom Menus, and is the easiest way to define menus based on pages/categories/links/posts/custom post types… anything we need. So go at Appearance ->Menus and define your Custom Menu as usual, arranging items by drag and drop. I named my custom menu as “main-menu” (always use only western characters for menu names, I saw sites broken because of using special characters in names) DON’T assign it to any Navigation Bar – will conflict with Suffusion Menus. We will use the menu either in Widget Area Above Header (for a top navigation bar), or in Widget Area Below Header (for main navigation bar).
5. Go to Suffusion Options -> Other Graphical Elements -> Navigation Bar Below Header (or Above Header – depends where you wish the new menu) and disable the Navigation Bar (set Hidden at the first option from “Look and Feel”).
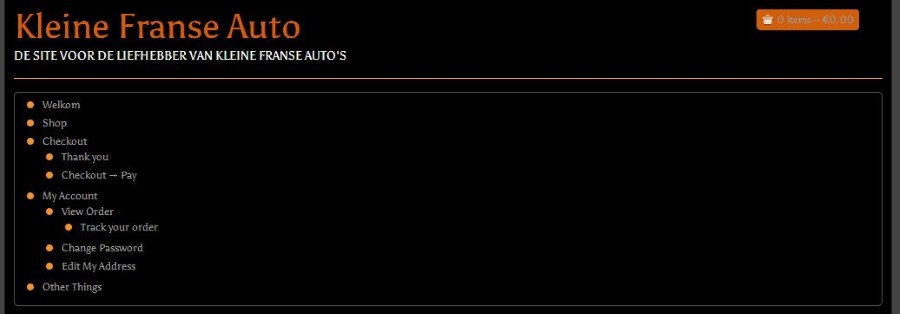
6. Now, go to Appearance -> Widgets and add a Custom Menu Widget into the desired widget area (I used Widget Area Below Header). Because we didn’t yet any magic, the menu will look like an unordered list:
7. Now we need to do a little research work. Use Inspect Element in Chrome/Firefox Aurora/Opera/Safari or Firebug in Firefox. Right click on the first menu item from the list and select “Inspect Element”. Will see the markup as below:

I underlined the 2 important information’s that we need – the ID assigned by WordPress to our menu – (menu-main-menu) and the class of its container (menu-main-menu-container).
8. Now it’s time for magic. Put the path to superfish.css at Suffusion Options -> Back-end -> Custom Includes -> First Additional Stylesheet link (mine is https://kleinefranseauto.nl/wp-content/sf/css/superfish.css). Also add the path to superfish-navbar.css at Suffusion Options -> Back-end -> Custom Includes -> Second Additional Stylesheet link (for me was https://kleinefranseauto.nl/wp-content/sf/css/superfish-navbar.css ). The path to waituntilexists.js need to be added at Suffusion Options -> Back-end -> First External Javascript file (mine is at: https://kleinefranseauto.nl/wp-content/sf/js/waituntilexists.js ). The path to superfish.js need to be added at Suffusion Options -> Back-end -> Third External Javascript file (mine: https://kleinefranseauto.nl/wp-content/sf/js/superfish.js ). Optional, at Second External Javascript file can put the link to hoverIntent.js (I added it as https://kleinefranseauto.nl/wp-content/sf/js/hoverIntent.js ).
Now can add the trigger function at Suffusion Options -> Back-end -> Custom Includes -> Custom Header Javascript. I modified the sample function from Superfish site as below:
|
1 2 3 4 5 6 7 8 9 10 11 |
$j=jQuery.noConflict(); waitUntilExists("menu-main-menu",function(){ $j('ul#menu-main-menu').addClass('ssf-menu sf-navbar'); //add classes for superfish (ssf-menu) and navigation bar (sf-navbar) to Custom Menu $j('ul.ssf-menu') .find('li.current_page_item,li.current_page_parent,li.current_page_ancestor,li.current-cat,li.current-cat-parent,li.current-cat-ancestor,li.current-menu-item,li.current-menu-ancestor,li.current-menu-parent') .addClass('current') .end() //add .current class for any menu item in the selected tree .superfish({ pathClass : 'current' }); }); |
The code add classes needed by superfish and nav-bar to our list with id of menu (you remember we found this ID with the help of Inspect Element in step 7 – use that id in your code). Then it add the “current” class to all ancestors of currently selected element – this is needed to maintain the navigation bar active when the user select any item from tree. Finally execute the superfish magic to those elements. Because of waituntilexists function all things happens instantly when menu-main-menu element is defined in HTML source. If you look now to your site the menu already start to look like on the Superfish site.

9. The final step is to format our menu to looks “themed”. At Suffusion Options -> Back-end -> Custom Includes -> Custom Styles I added:
|
1 2 3 4 5 6 7 8 9 10 11 12 13 |
#nav {display:none;} /* hide the remaining line from Suffusion Navigation Bar */ #horizontal-outer-widgets-1 .suf-widget, #horizontal-outer-widgets-1 .dbx-content {overflow:visible;border:none;} /* open the widget area, otherwise the menu will be constrained inside it */ .menu-main-menu-container {width:100%;height:80px;background:#F6AC3D;} /* extend the menu container to fit in the wrapper and to contain both navigation and sub-navigation bars */ /* START THEMING of the menu */ #menu-main-menu {width:100%;background: #F6AC3D url(https://kleinefranseauto.nl/wp-content/themes/suffusion/images/bg-orange.png) repeat-x top left;} #menu-main-menu li {padding-left:0;} li.menu-item, li.menu-item.current, li.menu-item a, li.menu-item a:visited {background:none;} li.menu-item a, li.menu-item a:visited {color:#fff;} li.menu-item:hover {background:orange;} .sf-navbar ul li {background:none;} .sf-navbar li:hover, .sf-navbar li.sfHover, .sf-navbar ul li.current, .sf-navbar ul li:hover, .sf-navbar ul li.sfHover, .sf-navbar ul ul li {background: orange;} .sf-navbar ul ul li:hover, .sf-navbar ul ul li.sfHover, .sf-navbar ul ul li.current {background:#F6AC3D;} /* END THEMING */ |
On our sample site I use “Orange on a dark theme” skin, so, my changes was intended to mimic this skin. You will have to change your additions between /* START THEMING */ and /*END THEMING */ to look as you like on your site.
The final look on our site:

Ciprian
Experienced web developer and graphic designer. Former consultant for Suffusion theme and former moderator on Suffusion Support forum. I teach others while learning myself.

2 Responses to “Horizontal Dropline Menu in Suffusion”